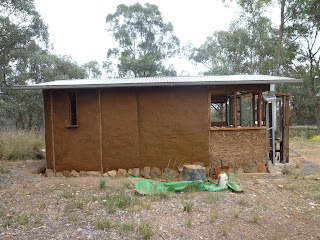
Saturday, 31 December 2011

Rocking the north wall

Window seat rocks
Rocks, as it turns out, are heavier than I remember.  I had left the largest, prettiest rocks for the north wall, and some of them were so big I couldn't even move them, let alone lift them.  Thank goodness for TJ.  

3D jigsaw puzzle
It was tough work in full sun and we were wilted by lunchtime but we got it done. 

I should point out that none of these rocks come from the bush.  They were all left close to the house by the previous owners and we think they originally came from the house excavation.  Even so, rocks are an important element for biodiversity so we checked carefully and didn't leave anyone homeless.

I wasn't kidding about the scorpions
When it was too hot to work outside I had a bit of a play with the sub-soil I got from my brother's place.  I started with a basic sediment test, which had some surprising results.

Sediment test - our mud (left) versus Hepburn mud (right)
I tested it against our our own soil, hoping to get some idea if it had more or less clay - I was looking for more clay.  That's our soil on the left, which has settled into three or four distinct layers - sand and grit at the bottom, then a wide band of silt/clay topped with a narrow band of pure clay.  Then there's a layer of muddy water on top and some floating organic matter.

The Hepburn soil on the right behaved very differently.  Other than a tiny layer of clean water on the top, it all remained in a thick suspension for hours.  I think it has so much clay, nothing has settled out of it.

As soon as it was cool enough to move again, we went down to the dairy and got some cow manure so we could make a test-batch of render with the Hepburn soil.  I tried it out on the gaps in the east wall where choughs had eaten the render.

New mud patches
The test-batch of render was very sticky and great to work with - 100% easier.  I also used the sugar cane mulch instead of chaff, to make it less edible (!) and that also works just fine.  Anything this good has to come with a catch, so I predict that this high-clay mix will crack a lot when it dries.  But honestly, I don't care, so long as it goes on easily and stays on.  I can fill cracks in the next layer.

Rendering around the local rocks shows very clearly that this is not the local soil.  The red-brown walls harmonised with the landscape, because they were made of the same stuff.  But I can cope with the colour.

 Tomorrow I'll do some more render if I get up early enough, but it's going to get stupidly hot so we'll go back to town for a couple of days.

Friday, 30 December 2011

Summer mudding

space creature examines hole in floor
We are here for two weeks for summer break, so I hope to show a bit of progress every day or two.  We have some ambition to get the fourth wall up, the internal wall up, the sub-floor prepared and the first three walls rendered so that when we go home it will look like a proper building.

The main thing holding us back is the heat.  Today will be about 35 degrees, and the following two days will likely push 40 degrees up on our ridge.  There are only a few useful hours for outdoor work when it's that hot.

My job for today is to find some rocks, lift them up and apologise to the scorpions that live under them, move them into place on the footings then move them a few more times until they look pretty.  It's 8.30am and the sun is already a great big orange thing, so I decided to blog about it over a coffee instead of getting straight out there.

TJ is going to finish digging holes in the floor for a bit of concrete work - a small slab for a wood stove and stirrups for the base of all the joinery, because we can't let any wood touch the floor (termite country).

New pile o' dirt
Rendering the east wall taught me that our own pile of dirt, which was excavated from the footings trench, doesn't have enough clay in it.  The render has set brilliantly, but it was very difficult to apply to the wall.  But my brother who lives nearby has a pile of dirt he doesn't have immediate plans for, so we brought some home in his trailer and I'll test that out in the next day or two.

I grossed out my niece M by shaking some of that dirt pile in a jar of water to settle the sand to the bottom, then rubbing the top layer on my teeth.  This is how I test for clay - clay and silt look the same to me, but silt is gritty.  This stuff felt smooth.  So, here's hoping.

Monday, 5 December 2011

Now BIRDS are eating the mud shed?!


You remember my beautiful east wall render, worked smooth and snug around the lovely natural stone?

Well, white-winged choughs are eating it.

Goddamn it.
I really, really, REALLY need to stop making this house out of gingerbread.

It's my own fault.  I'm too lazy to chop up straw into tiny pieces for the render, so I buy bags of chaff.  Chaff is pre-chopped bits of straw meant for animal feed, with some oat seeds in it.

But here's the thing.  Chaff makes for a lovely render.  If you think of mud render being like a concrete mix, chaff is the aggregate.  It gives the clay something to bind.  Without it, the clay will bind to itself and crack when it shrinks.  Chaff also makes a bucket of clay go a lot further, and a lot lighter. It also helps smooth out the bumps in the wall ready for the top coat.  A $20 bag of of chaff will do a whole wall.

Spot the cracks? Nor can I.
The only draw-back is IT'S SODDING EDIBLE.

Back in winter there was a mouse plague, so mice were prising the seeds out of the render and eating them.  It was kind of cute, and soon enough small carnivorous marsupials called Tuans moved in and ate all the mice (hooray! Tuans are endangered - if humans had more sense we'd set up nesting boxes all over Melbourne).

I don't know what to do about the Choughs.  They stand on the ground, attacking the shed with their beaks.  I didn't even know they ate seeds.  Maybe they're just curious? They are glorious creatures that live in big family packs and make an unearthly whistling crying sound.

White-winged Choughs, from the fabulous Natural Newstead website
Perhaps they will stop when I do the next coat of render, since that will enclose the chaff in a layer of mud and manure?

I don't want to chop up my own straw bits, because it's a health hazard (dust and spores) and straw has seeds in it anyhow.

I'm thinking of trying some of that chopped up sugar cane mulch you buy in shrink-wrapped bales.  It costs more than chaff, but it should be seed-free. Perhaps the shed will be attacked by Sugar Gliders and wattle-birds now.

The great water tank migration

Brrrm, brrrrm, brrrrm
We have a water tank now.  You have no idea how hard it is to get one of these things from the industrial area where it is made to a place in the middle of nowhere where we live.

They don't deliver to the middle of nowhere.  Well they do, but you have to pay for a truck and two workers, each way.  So TJ hired a trailer and I borrowed some old tyres to protect the tank from the edge of the trailer and he drove it at about 20km/hr on a major freeway on a windy day, listening to the gentle sound of every other vehicle beeping him.  On its side and empty, this thing was a huge sail trying to make the trailer go in a different direction from the car.  I'm really glad I wasn't there.

Last weekend, we found some old treated pine logs and used them as rollers under the tank to move it across the landscape.  It was nice to find a use for the Logs That Will Not Die - you can't build with them, cut them or burn them because they are contaminated with arsenic for all eternity, but you can roll a tank over them.  We inched that baby over the ground, laying ply from the formwork over rocks, to get to the new tank stand.

I never did blog the tank stand.
Check out the form work! That was some serious maths.

The tank stand took us about two whole days to make out of concrete, back in winter or early spring. Just as we screeded off the top (I have all the concrete lingo now) it started pelting with rain.  We covered it as soon as we could, but as us concrete experts know (trust me, over the years I've made one thing out of concrete), you can't go back and smooth it out again or the cement will rise out of the mix and it will crack.  Thus, something as ephemeral as a raindrop is immortalised for eternity.

"Greeeeg the stop sign ..."
Luckily, we have now removed the formwork and covered that mess in a water tank that fits to within a few millimetres. Here's the finished product.  Very rural.

Just add water

Friday, 25 November 2011

Winds light to variable

Well, not exactly.  A few days after my last post, there was a violent wind storm, including one or more small tornados in our area.  Nobody is really sure how many, and we're trying to figure it out from the patterns of damage.

One twister dropped in about 10m from the house and ripped apart four trees on three sides of it.  We were incredibly lucky that only one fell on the roof, and even then the damage was quite minor.  It only smashed a few metres of the verandah roof.

One of those trees was twisted in two and fell towards the mud shed, missing it by inches.  In fact, the verandah guttering was bent as the uppermost twigs and leaves brushed past on their way to the ground.  TJ just bent it back up again.

This all happened during the week when we weren't here.  I'm slightly ashamed to say that when a neighbour rang to say there was a bit of storm damage on the road in front of our place, my first thought was  "I hope it didn't pull the wet render off the east wall".  My second thought was "I'm really glad I didn't say that out loud".

We spent a weekend sawing up some of the trees close to the house.  The following weekend we caught up on some gardening and walked the property, trying to figure out if it a single twister looped back on itself and zig-zagged along, or if there was more than one.  Everything seems unsettled and wrong while there are still fallen trees near the house, but we should finish cutting them up tomorrow.

We are just incredibly lucky.  Looking at the intense but contained patches of broken trees, it was clear that this thing came of the sky like the hand of god, irresistibly powerful, breaking everything for a few seconds or minutes each time before it withdrew.  I'm certain that if it had come through the house instead of next to it, I would be typing this somewhere else.  If it had touched the water tank on its tall stand instead of passing a metre or two from it, or if it had pushed over entire trees instead of breaking them up in mid air, or any other of a series of minor differences, I would be typing this somewhere else.  Our insurance was due the day before it hit and we had paid it.  Like I said, lucky.

Sunday, 6 November 2011

An hour of render, times eight

6.15am Sunday
 This was my Sunday, hour by hour, rendering the east wall.

7am - the sun rises
8am - struggling with render quality - three distinct batches on one panel but the last one is good

9am - on a good batch of render and sailing along - stopped for brekkie until 10am
11am
12 noon.  This panel looks more finished than it is - the mud is just slapped on.
1pm.  Tiring now. This looks the same, but I've squished the mud into the wall more thoroughly, smoothed it and cleaned around the rocks and the woodwork.  I've trimmed the straw on the final panel and started slapping mud onto the section over the window.
2pm.  Nearly there!  A frustrating, hungry hour in which the render would not stick to the wall.  Mix after mix slumped off.  Then lovely gentle warm rain started falling and I persevered, but I'm not sure the mix ever really did stick to the wall. Maybe it will still be there next week, maybe not.
2.40pm.  Finished and cleaned up.
Lovely Sunday.

Tuesday, 1 November 2011

Aye sir, render

Fresh render, East Wall
Well, I couldn't put it off forever, so yesterday I finally got it together to apply a fine new garment of render to the west wall.

This marks an important turning point in the mud shed building, because the framing (TJ's job) is nearly complete and the mud work (my job) becomes the main task.  In case you haven't noticed, I've been procrastinating like crazy.  It's hard work, but now I've started, I feel better about it and I'm looking forward to doing more rendering next weekend.

The big difference is, I finally got the phone number of that guy who runs a dairy down the road, rang him up and arranged to come and collect some fresh cow poo from the milking shed for the render mix.

Cow poo is the magic ingredient in a good mud render.  It binds the other ingredients, adds fibre (finely chopped grass), makes the mix easier to handle and when the mix dries, it is harder and more weather resistant.  And here's a great steaming bucket of it for your enjoyment.

Not as stinky as you might think
This is the first coat ("parging coat") of render.  Its task is to stick to the walls, fill all the bumps and make a smooth, flat surface.  So it contains a lot of chopped straw (I just use chaff, because it's cheap and pre-chopped).

The mud I used this weekend didn't have enough clay in it, so it didn't want to stick to the wall.  It was really hard going.  It didn't want to stick, and I had to keep scraping it up and re-applying it, pushing it into the surface.  I wanted to throw the whole mix out, but where would I throw it?  The easiest way to dispose of it was on the walls.

So once I finished the patch I set out to do, to the left of the door, I just kept rendering.

Before (the green stuff is masking tape)
After!
Funnily enough, after spending a day covering the walls, I didn't feel like I had added something to the shed so much as uncovered something.  With the excess straw trimmed and clothed, you can see the structure better.  The rocks, the frame, the curved door surrounds.

With and without render

I also got around to finishing that patch of the south wall that was left bare all winter after I ran out of render that day back in April.

South wall patch
I'll be interested to see how different the two mixes are once they are dry.  The mix from April was full of clay (it's the colour of terra cotta!), so it stuck to the wall like anything but it has cracked a lot.  Cracks in the first coat are OK, so long as the render doesn't peel off.

Today's mix was brown and full of silt, which feels superficially like clay (that's how I made the mistake), so it was difficult to apply.  But once it was on the wall it was easy to manipulate.  I was able to shape it and make it flat.  I'll be interested to see what it's like when it dries.

1st coat ("parging coat") render - fluffed up with straw


Monday, 10 October 2011

North wall starts to pop out

North wall frame - the big bits are up
Well hello.  Forgot I had a blog for a little while there - sorry.

Not that our progress on the mud shed is anything to write a blog about.  I've been distracted with the important business of being alive in the springtime, and TJ has been distracted by having a job that calls on him to work for six solid weekends, right when he wants to bolt some old bits of timber to the concrete.

But he has made some progress on framing up the north wall.  The main shape of the window seat and its little roof have started to emerge from the main building, with some typically solid joinery.  We haven't even added the bracing and I can already swing from the top-plate without it moving an inch.

Joining two thick wall frames (got enough bolts in that thing?)

Meanwhile, while I'm waiting for the chinese book industry to stop working weekends, I could be getting on with some render, but it's spring, and there are wildflowers, and there's a food garden to plant, and there are native animals living in the fabric of my house!  It's distracting.

If this wasn't a mud shed blog, I could post a hundred photos of local wildflowers.  

Hoary Sunray - Leucochrysum Albicans
Actually I do have a few other building things to show, and I'll write another post soon.  Meanwhile, have an echidna.  


Tuesday, 30 August 2011

A celebration of dodgy formwork

Dodgy west-wall form-work, with dodgy annotations in crayon
This post is a celebration of just how temporary form-work can be when you are working with something as flexible as Light Earth.  I'd like to see the sort of engineering you'd need to do these awkward bits of wall in rammed earth!

The photo above shows bits of wall that have frames made of wood or metal that we didn't want to damage with screw-holes, because we're not going to render over them.  When I shoved the straw-mud mix in the column on the left, TJ held the laminex boards in place with his hands.  Then we tied it on with bailing twine for an hour while it dried.  Yes, bailing-twine.  Is there anything it can't do?


New!  Sliding formwork technique!
This is a new technique I developed last weekend.  I wish I'd figured this out before I did the tops of all those other wall panels!  There's always a gap at the top of every wall that you have to fill with mud free-hand, because you can't put formwork all the way to the top (think about it). Usually I shove mud into the gap and try to smooth it down with a pastering tool called a float.  It always looks awful, and I disguise it with render later.

This time, I used the float as a bit of hand-held formwork.  As you can see from the very elegant hand-modelling above, I held it in place with one hand, and with the other hand I shoved handfuls of straw in the side.  Then slide it along and continue.  It's the neatest bit of gap filling I've ever done.  Hurt my left arm a lot, though.  Ow, ow ow ow ow.  Ow.

Since it's such a neato new thing, here's another photo showing the sliding formwork technique.


That photo also shows a dodgy wedge-shaped bit of formwork above a window.  We hammered lots of bamboo into the wall to hold the mud in place, but even we were surprised when we took away the formwork and the mud continued to defy gravity!


The tall window in the west wall needed a deep, slightly sloping window surround. The picture below shows how we mocked up the formwork with some old laminex door bits, cut to size and screwed in place against the front panel of formwork..

Window surround formwork

There is a flat piece of ply on the back, covering the whole area.  You shove mud-straw mix in the top, try not to get the ceiling dirty and hope for the best (we did the gap at the top before I developed the sliding formwork technique, above).


Gable, showing repairs and preparation

TJ made two pieces of formwork for the gable. They are only held in at the bottom, leaving a gap at the top to shove straw into.  The photo shows a few pieces of bamboo in place for the next half, but we wedged lots more bamboo into the gap between the ceiling and the frame.  The walls will dry around the bamboo pieces, tying the wall to the frame.  When this half of the gable had dried for an hour, we removed the formwork and flipped it around to do the other side.

And finally, here, have a couple of sugar-gliders in a nesting-box.

Adorable.


Our nest-building really is pretty amateurish compared to theirs. They gather the grey-box leaves in their tails, and bring them into the nest via that little hole you can see in the bottom of the box behind the baffle (the box usually has a lid on the top).


In a few days we will be going to Clydesdale for a whole week!  I can't wait to get started on that north wall.


Monday, 29 August 2011

Three walls done! Whoo!

Three walls!  Whoo!
We have reached the three-wall* milestone in the mud shed, thanks to the hard work of visiting buddy GW.  It looks like a very large doll's house, with the front wall missing!

This blog post is pretty well just a report on what we finished off last weekend. We did all the difficult bits we had left until later- the gaps that needed filling, the awkward spaces, the awkward window surround. I'll try and do another post on  how we achieved it, which will probably be called something like "a celebration of dodgy formwork".

East wall done!*
We finished* the East Wall, including the area around the tall thin window, some gaps in the middle panel and the awkward area on top of the big window.  You can't see it because it's in shadow.  But it's there.  We finished at dusk on Saturday. By mid-morning Sunday some blazing winter sunshine had started drying the wall - you can't even see the border of the new material.

View from tall window
This is the view from the inside of the East Wall, looking out.  At least, that's how it looks if you stand in just the right spot to avoid seeing the Termite Shed.  The very elegant tree is a Grey-Box.

The gable - done!
On Sunday we filled in the gable above the South Wall (the triangle above the two main panels).  I miss the view of the tree-tops through the gap.  But in compensation, we have a lovely view through the circular window, which I finally got around to trimming a bit.
Circle window - Long-leaf box
The tree you can see through the window is a Long-leaf Box, a type of rough-barked eucalypt (gum tree) with very blue-grey leaves and a habit of growing in a quirky twisted form.  The branch through the window shows both the plump round juvenile leaves and the long slender adult leaves.

Gemini Corner
The incredible GW also completed* the corner that joins the East Wall to the South Wall, and did a neat job of it, too.  I have named it after her, honouring our "you built it, you own it" policy.

West Wall
We even filled all the gaps** in the West Wall - the gap above the window, and the column next to it.  It's really neat up there above the window - I'll tell you the new technique next time.

* Yeah, when I say "finished" I'm not counting render. This means I get to "finish" each wall four times. Once when the light earth is in place, once each for two coats of render and once for mud-paint.  More champagne!

** Just now, looking at this photo, I noticed there is still a gap above the sodding door.  How did I not notice this yesterday?