Tuesday 30 August 2011

A celebration of dodgy formwork

Dodgy west-wall form-work, with dodgy annotations in crayon
This post is a celebration of just how temporary form-work can be when you are working with something as flexible as Light Earth.  I'd like to see the sort of engineering you'd need to do these awkward bits of wall in rammed earth!

The photo above shows bits of wall that have frames made of wood or metal that we didn't want to damage with screw-holes, because we're not going to render over them.  When I shoved the straw-mud mix in the column on the left, TJ held the laminex boards in place with his hands.  Then we tied it on with bailing twine for an hour while it dried.  Yes, bailing-twine.  Is there anything it can't do?


New!  Sliding formwork technique!
This is a new technique I developed last weekend.  I wish I'd figured this out before I did the tops of all those other wall panels!  There's always a gap at the top of every wall that you have to fill with mud free-hand, because you can't put formwork all the way to the top (think about it). Usually I shove mud into the gap and try to smooth it down with a pastering tool called a float.  It always looks awful, and I disguise it with render later.

This time, I used the float as a bit of hand-held formwork.  As you can see from the very elegant hand-modelling above, I held it in place with one hand, and with the other hand I shoved handfuls of straw in the side.  Then slide it along and continue.  It's the neatest bit of gap filling I've ever done.  Hurt my left arm a lot, though.  Ow, ow ow ow ow.  Ow.

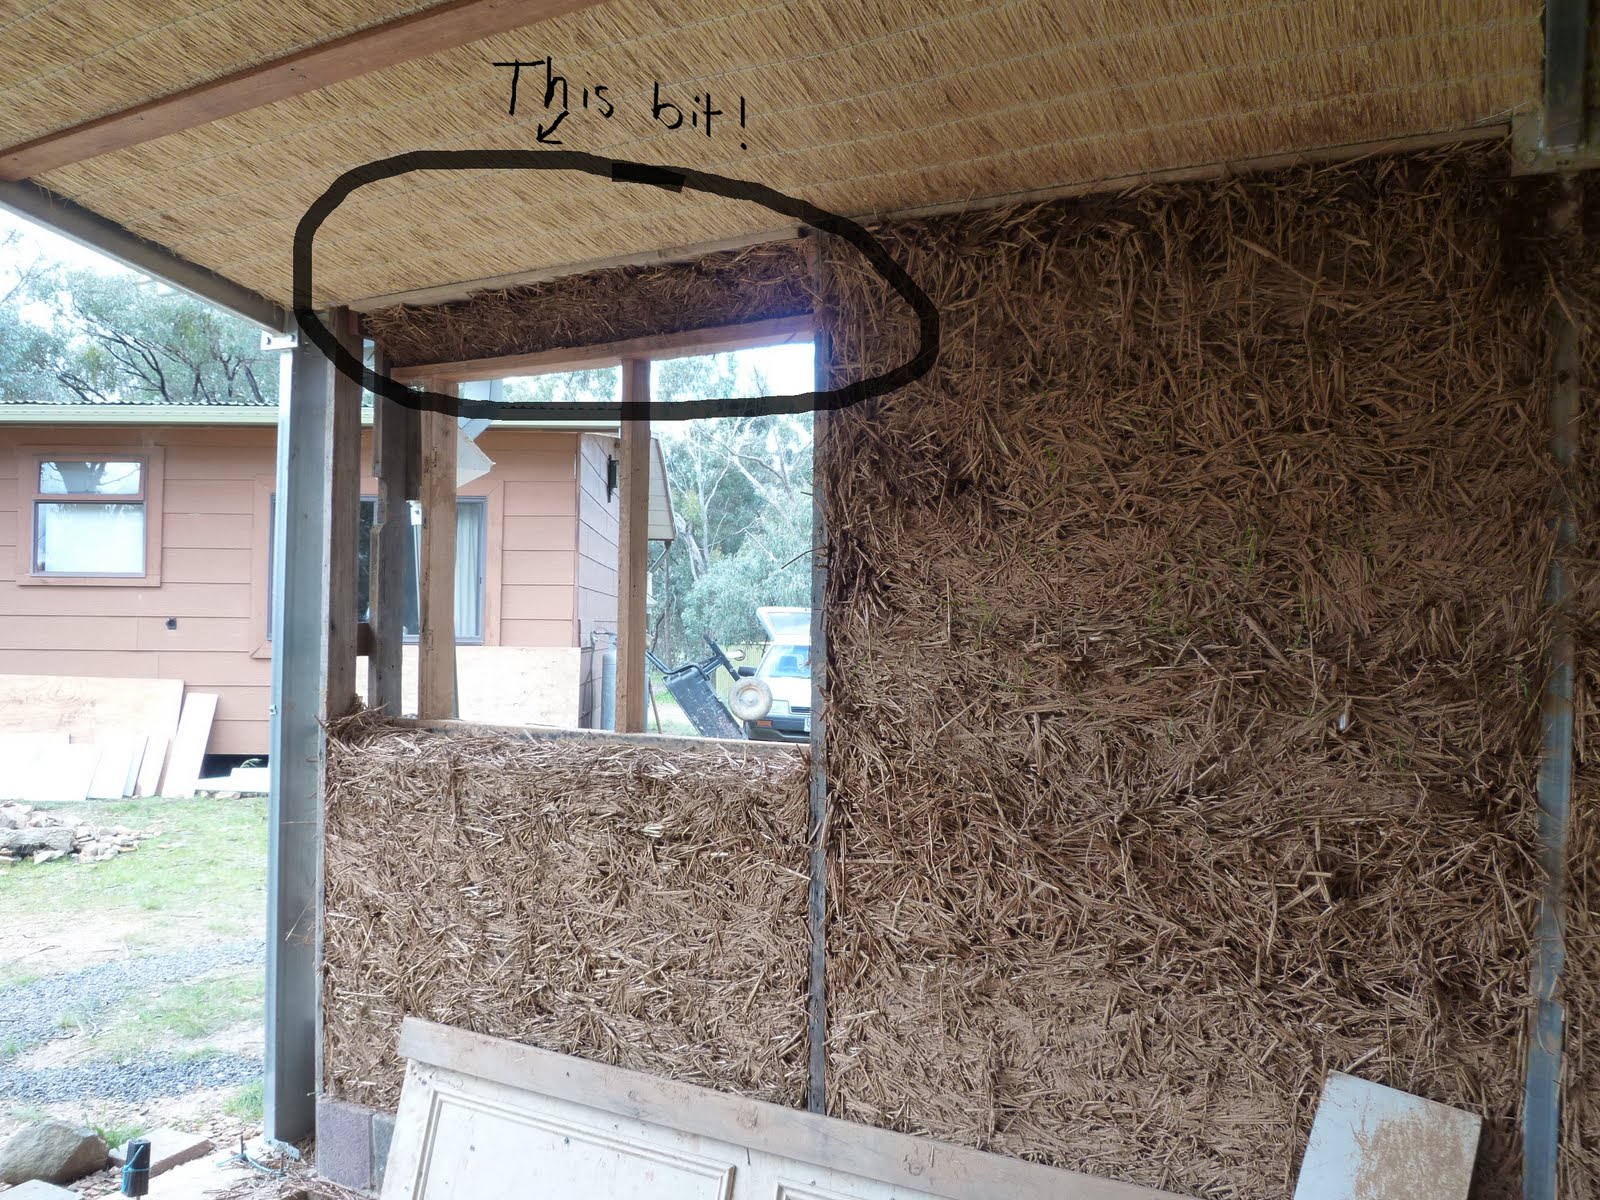
Since it's such a neato new thing, here's another photo showing the sliding formwork technique.


That photo also shows a dodgy wedge-shaped bit of formwork above a window.  We hammered lots of bamboo into the wall to hold the mud in place, but even we were surprised when we took away the formwork and the mud continued to defy gravity!


The tall window in the west wall needed a deep, slightly sloping window surround. The picture below shows how we mocked up the formwork with some old laminex door bits, cut to size and screwed in place against the front panel of formwork..

Window surround formwork

There is a flat piece of ply on the back, covering the whole area.  You shove mud-straw mix in the top, try not to get the ceiling dirty and hope for the best (we did the gap at the top before I developed the sliding formwork technique, above).


Gable, showing repairs and preparation

TJ made two pieces of formwork for the gable. They are only held in at the bottom, leaving a gap at the top to shove straw into.  The photo shows a few pieces of bamboo in place for the next half, but we wedged lots more bamboo into the gap between the ceiling and the frame.  The walls will dry around the bamboo pieces, tying the wall to the frame.  When this half of the gable had dried for an hour, we removed the formwork and flipped it around to do the other side.

And finally, here, have a couple of sugar-gliders in a nesting-box.

Adorable.


Our nest-building really is pretty amateurish compared to theirs. They gather the grey-box leaves in their tails, and bring them into the nest via that little hole you can see in the bottom of the box behind the baffle (the box usually has a lid on the top).


In a few days we will be going to Clydesdale for a whole week!  I can't wait to get started on that north wall.


Monday 29 August 2011

Three walls done! Whoo!

Three walls!  Whoo!
We have reached the three-wall* milestone in the mud shed, thanks to the hard work of visiting buddy GW.  It looks like a very large doll's house, with the front wall missing!

This blog post is pretty well just a report on what we finished off last weekend. We did all the difficult bits we had left until later- the gaps that needed filling, the awkward spaces, the awkward window surround. I'll try and do another post on  how we achieved it, which will probably be called something like "a celebration of dodgy formwork".

East wall done!*
We finished* the East Wall, including the area around the tall thin window, some gaps in the middle panel and the awkward area on top of the big window.  You can't see it because it's in shadow.  But it's there.  We finished at dusk on Saturday. By mid-morning Sunday some blazing winter sunshine had started drying the wall - you can't even see the border of the new material.

View from tall window
This is the view from the inside of the East Wall, looking out.  At least, that's how it looks if you stand in just the right spot to avoid seeing the Termite Shed.  The very elegant tree is a Grey-Box.

The gable - done!
On Sunday we filled in the gable above the South Wall (the triangle above the two main panels).  I miss the view of the tree-tops through the gap.  But in compensation, we have a lovely view through the circular window, which I finally got around to trimming a bit.
Circle window - Long-leaf box
The tree you can see through the window is a Long-leaf Box, a type of rough-barked eucalypt (gum tree) with very blue-grey leaves and a habit of growing in a quirky twisted form.  The branch through the window shows both the plump round juvenile leaves and the long slender adult leaves.

Gemini Corner
The incredible GW also completed* the corner that joins the East Wall to the South Wall, and did a neat job of it, too.  I have named it after her, honouring our "you built it, you own it" policy.

West Wall
We even filled all the gaps** in the West Wall - the gap above the window, and the column next to it.  It's really neat up there above the window - I'll tell you the new technique next time.

* Yeah, when I say "finished" I'm not counting render. This means I get to "finish" each wall four times. Once when the light earth is in place, once each for two coats of render and once for mud-paint.  More champagne!

** Just now, looking at this photo, I noticed there is still a gap above the sodding door.  How did I not notice this yesterday?


Tuesday 23 August 2011

Planning, with orchids and wildlife on the side

North Wall drawings
We haven't been able to build for a month, because whenever the sun has shone poor TJ had to work weekends, and when he was free it was rainy.  We'll start building again this weekend, but meanwhile we've spent some time planning the north wall.

The plans we submitted to council just had a drawing of a window seat popping out, a little roof, and a few basic notes, like that we'd frame it up in 'seasoned hardwood'.*  Now we've got to figure out how to do it!

The window seat is all corners, all angles, all complicated.  The walls will be 30cm thick below the seat then 15cm thick above. There's a seat to sit on and a ledge to lean on. There are windows to frame up, a little ceiling to hang and a roof on the top. Everything has to take a lot of knocking around without moving.  I can't say we've got all the answers yet.


Corner stud framing dummy-run

We did a dummy-run of a corner framing stud with a few off-cuts, just to see in 3D what we were planning.  I plonked it down in place, and was pretty chuffed to find the pieces of reo bar that I cemented into the footings the day they were poured line up exactly with the model of the stud pieces.

All we have to do is drill a hole in the bottom of each framing piece and lower it into position, and the base of the wall will never, ever move laterally again.  Neat, eh?

While TJ's been away, I've been wandering around, checking on the plants and some of the wildlife.

The Mammal Survey Group from the Vic National Parks Association came up to check the nesting boxes on some adjacent properties (we can do ours ourselves).  We found some incredible Tuan and Sugar Glider nests, and a few inhabitants.

Sugar Gliders all snuggled up
The first orchids have started flowering - Nodding Greenhoods.


They always remind me of a protest march, or maybe that John Brack painting.  I really love them.  I kind of like their attitude - faces down, no glitz, entrap the odd gnat then back to hibernation before the devil sees them coming.

* Council wants everything framed in "seasoned hardwood".  We're not buying any old growth forest timber, so we scrounge wood from rubbish skips in Melbourne.  Some of the wood in this building has been seasoned since the 1930s!  I still need quite a few long pieces, so I take a different route to work each day and look down the back streets for renovations.  If we can find the builders we ask and they sometimes set some good wood aside, but mostly we just pull it out of skips before they get taken to the rubbish tip.  It really is criminal what we waste.